A garage floor rarely fails all at once. It starts with a few shallow holes near the overhead door, rough patches where tires park, or small craters that collect road salt, water, and dirt. Left alone, those spots become harder to clean, more noticeable, and more vulnerable to further breakdown. Professional garage floor pitting repair addresses the damaged concrete before a protective floor coating is installed, giving the finished floor the strength and clean appearance homeowners expect.
Pitting is not just a cosmetic issue. It is often a sign that the concrete surface has weakened after exposure to moisture, de-icing salts, freeze-thaw cycles, vehicle traffic, or an original finish that was improperly applied. A quality repair requires more than filling holes and painting over them. The concrete must be evaluated, prepared, repaired with compatible materials, and protected by a high-performance coating system.
What Garage Floor Pitting Actually Means
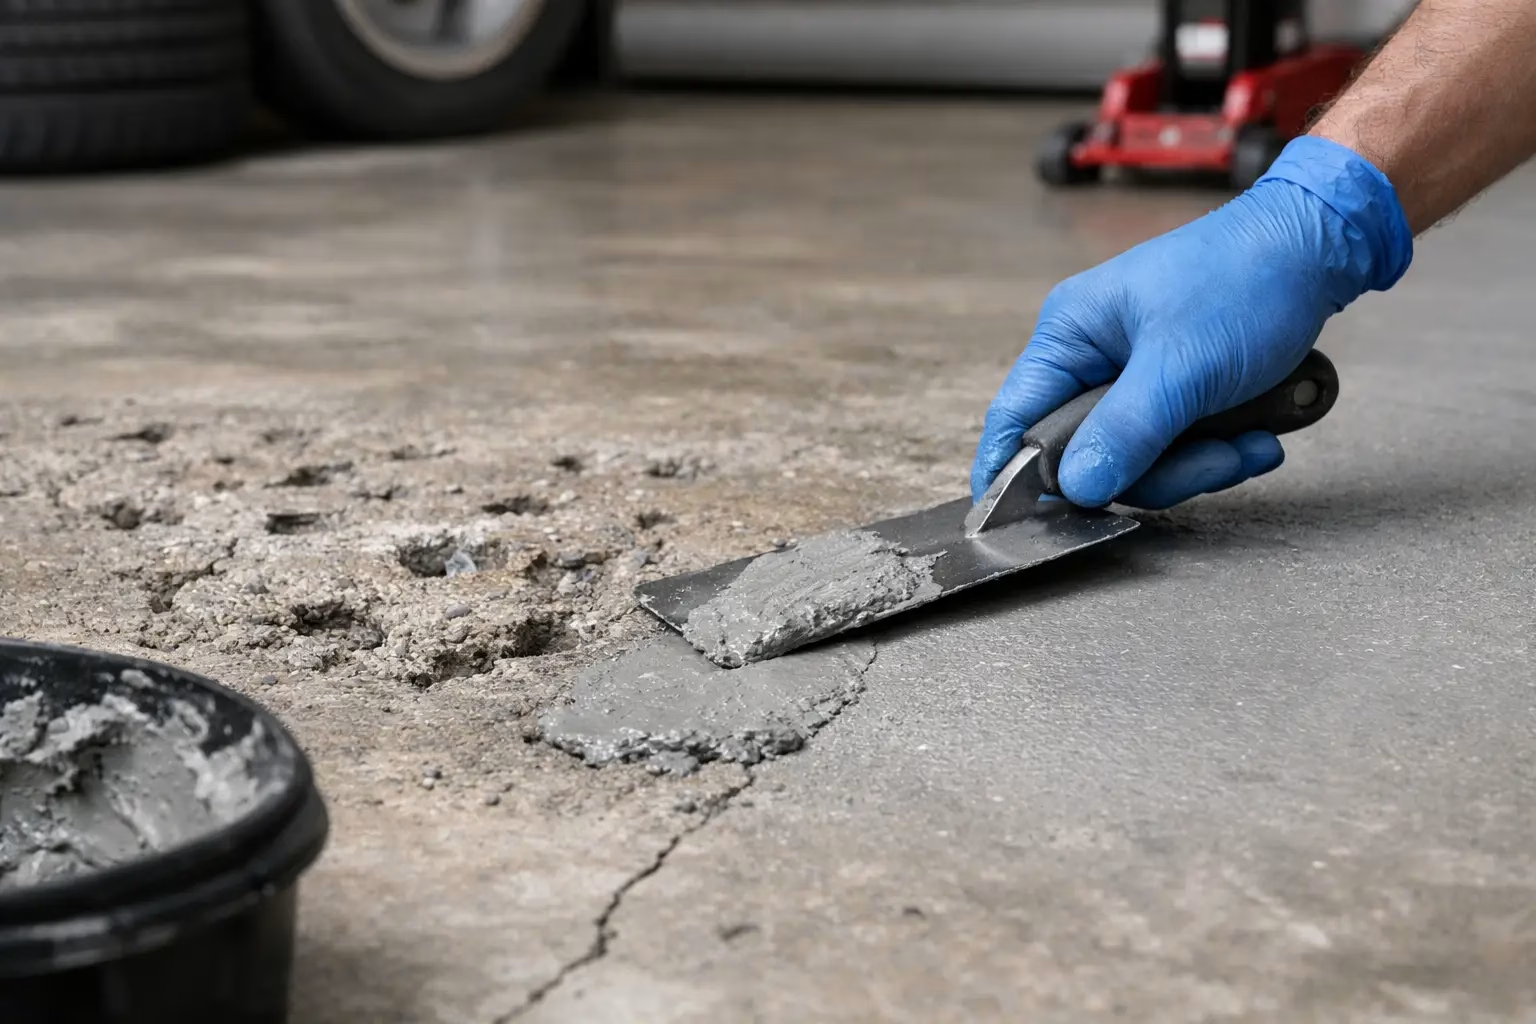
Concrete pitting is the loss of small pieces of material from the surface of a slab. The result can look like pinholes, shallow divots, roughened areas, or clusters of small craters. In a garage, it commonly appears along the vehicle path, near entry doors, below parked cars, and in areas where melting snow or rainwater sits for long periods.
Pitting differs from a structural crack. A crack may indicate movement in the slab, while pitting usually points to surface deterioration. That distinction matters because the repair approach changes. Cracks need to be opened, cleaned, and filled with a flexible or rigid repair material suited to the crack. Pitted concrete needs the weak material removed first, followed by a repair that bonds tightly to sound concrete.
A few isolated pits may be easy to repair. Widespread pitting, flaking, or spalling needs closer inspection. If the surface is soft, chalky, damp, or continues to break apart under light pressure, simply applying a coating will not solve the underlying problem.
Why Garage Floors Develop Pits and Surface Damage
The most common cause is moisture combined with salts. Water enters small pores in bare concrete, then expands during freezing temperatures. Road salt and de-icing products accelerate the deterioration by pulling moisture into the slab and attacking the concrete surface. That is why garages in areas with winter weather often show damage first where vehicles bring in snow, slush, and salt.
Poor concrete finishing can also contribute. If a slab was overworked during installation, finished while bleed water was still present, or cured poorly, the top layer may be weaker than the concrete below it. Over time, that thin weak layer wears away.
Other contributors include:
- Hot tires, vehicle traffic, and repeated point loads from jacks or equipment
- Oil, gasoline, battery acid, and chemical spills that remain on bare concrete
- Moisture vapor moving up through the slab
- Low-quality paint or conventional epoxy that peels, traps moisture, or fails under temperature changes
The practical takeaway is simple: pitting is often a surface problem, but the cause must be considered before selecting a repair and coating system.
Why Patching Pits With Hardware Store Filler Often Fails
A quick patch can make pits look better temporarily, but appearance is not the same as a durable repair. Many pre-mixed patch products are applied over dusty, weak, or contaminated concrete. They may shrink, debond at the edges, or remain visible through a thin coating. If moisture is present below the surface, the repair can fail even sooner.
DIY repairs also tend to skip mechanical surface preparation. Sweeping, vacuuming, or acid washing does not create the consistent surface profile needed for a long-term bond. A coating and repair material need clean, open concrete with weak material removed. Without that foundation, even premium products are being asked to adhere to a failing surface.
Conventional epoxy has a long history in garage flooring, but it is not our preferred solution for a repaired garage floor. It can be slower to cure and more susceptible to yellowing from UV exposure, hot-tire pickup, and performance issues when moisture and changing temperatures are part of the equation. A repaired floor deserves a system designed for real garage conditions, not a weekend paint project that may peel at the first sign of stress.
Our Process for Garage Floor Pitting Repair
At Garage Floors 4 Less, repair is part of the floor system, not an afterthought. We begin by assessing the condition of the slab, including pitting, spalling, cracks, stains, and potential moisture concerns. This helps determine whether the damage is superficial or whether deeper concrete removal and repair are required.
1. Mechanically prepare the concrete
The first step is diamond grinding the floor. This removes weak surface concrete, old paint or failed coatings, embedded contamination, and loose material around damaged areas. It also creates the proper concrete profile for the repair products and coating system to bond.
Grinding is essential because pitting often extends beyond the visible hole. The concrete around a crater may already be weak. Removing compromised material prevents the repair from being built on an unstable edge.
2. Repair pits, spalls, and damaged areas
Once sound concrete is exposed, we fill and rebuild pitted sections with professional-grade repair materials selected for adhesion and durability. Deeper voids may require multiple passes or a different repair approach than shallow surface imperfections. The goal is not merely to hide the damage. It is to restore a stable, level surface that can support the coating system.
Some repairs remain faintly visible in certain lighting, especially where damage was extensive. A full-flake broadcast finish is an excellent option in these cases because it creates a consistent decorative texture across the floor while helping visually blend repaired areas.
3. Install a protective high-performance coating
After repairs are properly cured and prepared, we apply our FloorX2 Fusion+Nano® system. This advanced polyaspartic and nanospartic technology is designed to outperform conventional epoxy in the places that matter most to garage owners: UV stability, rapid cure time, resistance to hot-tire pickup, and durability through demanding freeze-thaw conditions.
The system can be installed with a full-flake broadcast finish for a finished, easy-to-clean surface that looks purpose-built for the garage. Instead of leaving bare repaired concrete exposed to water, salt, and stains, the floor receives a protective barrier that makes everyday cleanup far easier.
When Repair Is Enough and When Replacement May Be Needed
Most garage floor pitting repair projects do not require replacing the slab. Surface pits, localized spalling, and minor deterioration are often very repairable when the concrete beneath is solid. Professional preparation and the right coating can give an old-looking floor a major visual and functional reset.
Replacement may be the better option if the slab has widespread deep deterioration, severe settlement, major structural cracking, or extensive moisture-related failure throughout the concrete. A professional assessment prevents spending money on a cosmetic repair when the slab has more serious issues.
There is also a middle ground. Some floors have deep damage near the garage door but remain sound through the rest of the space. Targeted repair, followed by a complete coating installation, can be more cost-effective than tearing out an otherwise serviceable slab.
How a Coated Floor Helps Prevent Future Pitting
No coating can reverse a structural slab problem, but the right system protects sound repaired concrete from the conditions that cause surface damage to spread. A professionally installed floor coating limits direct contact with road salt, melting snow, moisture, oils, and common garage chemicals. It also eliminates the porous, dusty texture that allows dirt and contaminants to settle into bare concrete.
Maintenance is straightforward. Sweep away abrasive grit, rinse off winter salt when needed, and clean spills before they sit for long periods. Avoid using harsh, highly acidic cleaners unless they are approved for the coating. The floor should work hard without demanding much from you.
For homeowners who want the garage to feel like an extension of the home, the benefits go beyond protection. A repaired and coated floor brightens the room, supports a cleaner storage setup, and makes the garage more useful for vehicles, hobbies, fitness equipment, and projects.
A Better Finish Starts Below the Surface
Pitting may look like a small problem, but the quality of the repair determines whether the floor holds up or starts breaking down again. The strongest result comes from removing weak concrete, rebuilding damaged areas correctly, and protecting the entire slab with a coating engineered for garage use.
Our FloorX2 Fusion+Nano® system is backed by our 15-year all-inclusive transferable guarantee, so you can invest in a garage floor built for more than a short-term visual fix. Try our Floor Visualizer to see finishes in your space, or request a free estimate to find out what your garage floor needs before the damage grows.